
Due: Tuesday, May 26 at 5:00 pm
The usual 48-hour grace period applies, but we strongly encourage you to submit on-time. That allows you to then focus on resolving open issues and readying your full system!
Goals
Your hard work on previous assignments has built a Mango Pi console that read commands from a keyboard and outputs its display to the monitor. For the pièce de résistance you'll rework your keyboard driver so that you can type as fast as the wind without dropping characters.
Conceptually, this assignment is about concurrency and preemption. Concurrency is when a program is able to do more than one thing at once. Preemption is when one task in a program can take control of the processor from another. Both concurrency and preemption are fundamental ideas to computer systems: this allows your phone to multitask between applications and allows a web server to handle tens of thousands of clients. In this assignment, you start from the ground up, handling the root of preemption in every computer system: interrupts.
In completing this assignment you will have:
- redesigned your PS/2 driver to use gpio interrupts so it doesn't drop scancodes, and
- used an interrupt-safe data structure to correctly share data across regular and interrupt code.
This also is the final task of your full system journey to
- write a library of modules that provide foundational support for implementing a bare-metal system
- construct a successful and complete system of your own top to bottom: your console running on your library modules
You have transformed your Mango Pi into a standalone computer, ready to be extended and improved in your final project. Way to go!
Get starter files
Change to your local mycode repo and pull in the assignment starter code:
$ cd ~/cs107e_home/mycode
$ git checkout dev
$ git pull code-mirror assign7-starter
In the assign7 directory, you will find these files:
ps2.c: library module- The starter code contains an empty
ps2.cfile. Copy/paste your existing code fromassign5/ps2.cto get your starting point.
- The starter code contains an empty
test_interrupts.c: test program, unit testsinterrupts_console_shell.c: console application program now using interrupts. You will use this program unchanged.extension.c: Edit this file to implement extension (if you choose)Makefile: rules to buildinterrupts_console_shellapplication (make run) and unit test program (make test)README.md: edit this text file to communicate with us about your submission- the subdirectories
mylibandfullsystemshow how to build and use your libmymangomylibhas symbolic links to your module source files and aMakefileto buildlibmymango.afullsystemis the console program running onlibmymango.a. Use this project as a model for an application that uses your library
The make test target builds and run the test program test_interrputs.bin that does simple unit tests. The make run target builds and runs the program interrupts_console_shell.bin.
Reminder:
MY_MODULE_SOURCESin Makefile Listing all your modules gives you extra testing in preparation for fullsystem submit. See instructions for use of MY_MODULE_SOURCES in assignment 3.
Redesigning ps2 for interrupts
In assignment 5, you wrote a PS/2 device driver that reads scancodes by polling. For assignment 7, you will rework it to read by interrupts instead.
Copy contents of assign5/ps2.c and paste into assign7/ps2.c. This is your starting point. You won't edit the original assign5/ps2.c file, preserve that version as-is. All new edits are made in the file assign7/ps2.c.
Your existing ps2_read function polls in a loop calling gpio_read to observe a falling edge. If not reading the clock gpio at the moment it changes, it won't observe the transition. Furthermore, the CPU is wholly consumed with waiting and can't do anything else. The drawbacks of the polling implementation are that it can miss events and it precludes doing other tasks.
Read over the function check_read_delay in test_interrupts.c. It reads a typed key then "sleeps" for a few seconds
to simulate a long-running activity. If you run this test on the polling implementation of ps2_read,
any keys typed while paused inside timer_delay are missed.
This is the expected behavior from the polling implementation.
Interrupts solve this problem. Instead of repeatedly polling, you configure the hardware to issue an interrupt on a falling edge event. The interrupt handler is invoked to immediately read the data when it is available, never missing a bit.
1) Configuring PS/2 interrupts
You want to be interrupted on each falling edge event on the clock gpio and in response to that event, read a single bit from the data gpio.
Start by writing a simple version of the handler function. The function needs to know which gpio to read from. The clock and data gpio are stored in the ps_device_t struct; we recommend you use the aux_data argument to pass a pointer to struct. For now, have your handler just announce the interrupt with a quick uart_putchar('+'). (if feeling fancy, can putchar '0' or '1' based on the data bit read, but stay away from complex printf; there isn't time). Be sure that the handler clears the interrupt or it will endlessly re-trigger.
Next you need to plug your handler into the interrupt system. Review the module interface for gpio_interrupt in header file gpio_interrupt.h. Here are the steps to take in ps2_new():
- initialize
gpio_interruptmodule - configure clock gpio for interrupt on negative edge, no debounce
- set your function as handler
The above steps are the event-specific parts of a gpio interrupt. You also need to configure the top-level interrupts module. Review the module interface for the global interrupts system in header interrupts.h. Here are the steps to take in the program main():
- initialize
interruptsmodule at start of program - flip the global enable switch after completing all configuration of interrupts
Some parts of arranging interrupts happen in a local context (i.e. per specific PS/2 device), others steps are taken globally (once for the entire program). You configure the gpio interrupt within the PS/2 module and interact with the top-level interrupts in the program main. This reflects the level at which the modules interact with the interrupt systems. Interacting with gpio interrupts is localized within PS/2 module; this is mostly a private matter of the PS/2 module implementation. The top-level interrupts module acts globally and use must be coordinated across the entire program; it is managed in the program main.
Test using the function check_interrupts_received of test_interrupts.c to confirm that your handler works. When you type a key, the handler should output a digit for each bit, 11 bits in total per scancode.
An interrupt handler should be designed to be simple and fast. Simple is important because debugging
interrupts is hard. Fast is important because you don't want to delay/miss the next interrupt.
Calling printf in a handler, for example, could
cause you to miss other events as even a relatively simple printf can take tens or hundreds of microseconds, longer than the period between PS/2 clock pulses.
2) Gather a PS/2 scancode
The falling clock edge indicates that now is the time to read a bit from the data line.
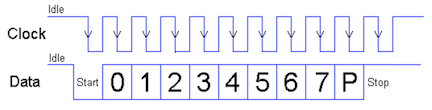
Your handler function will be called 11 times, once for each falling clock. Each invocation of the handler reads a single bit from the data gpio. Because each invocation has its own stack frame, you cannot use a stack local variable to store the accumulated scancode from call to call. Instead you will add state to the ps2_device_t struct. Pass the pointer to the device struct as the aux_data argument. You can add fields to the ps2_device_t struct to store whatever information you need to track the device state between calls to the handler function.
The assign5 ps2_read gathered all 11 bits of the scancode during one function invocation. You must restructure the code to gather the scancode across 11 separate calls to the handler function, each of which reads a single bit. If the handler detects a bit in error (wrong value or timeout), discard the partial scancode and resychronize on new start bit. Hint: Reviewing the finite state machine you sketched for the assign 6 style reflection may be helpful in working out the logic.
Tip: polling versus interrupt Our reference version of the
ps2module supports both reading in polling mode and reading by interrupts; the mode is configurable via an internal switch. Your ps2 module does not support a switchable version. Instead, you will have two distinctps2modules: the originalassign5/ps2.cthat reads via polling and the reworkedassign7/ps2.cthat reads by interrupt. You will not use assign5 version going forward; but the file is preserved in your assign5 directory if you want to review it.
3) Use ring buffer
When the handler function successfully receives the stop bit, it will have gathered a complete scancode. Next it needs to safely pass that scancode to the mainline. The ring buffer queue shown in lecture is just the tool for the job! (see ringbuffer.h)
Create a new ring buffer queue in ps2_new and add as a new field in the ps_device_t struct. The handler enqueues a completed scancode.
Change ps2_read to no longer poll; it instead waits until there a scancode available in the queue which it then dequeues and returns it. ps2_read always returns a scancode, either a scancode already stored in the queue or waits for a new scancode to be enqueued.
Testing and debugging
Use make test to run the test_interrupts.c test program. The starter code has simple manual tests to confirm interrupt are being processed. You might find it helpful to also re-use your assign5 tests that you used to confirm correct behavior the ps2 module and keyboard running on top of it.
Now you're ready to make run to test ps2 in the console_interrupts_shell program. This is the same console shell application from assignment 6, now reading scancodes via interrupt.
Using the interrupt-driven ps2 module, your console should never drop another key, no matter how much processing is consumed by updating the display, cool! Note that if your redraw is on the pokey side, typing ahead can enqueue several key events ahead of your console's response, so have patience as your console works through the backlog.
You now have a fully operational console running standalone on its hardware. What you have running is not too far from an Apple II computer.
Extension
The core task for assignment 7 is intentionally modest, as we want to reserve time for you to resolve any open issues and polish your full system. If you're already feeling solid on that and up for one last extension adventure, here are some ideas to consider:
- add a blinking cursor to your console using timer interrupt
- use timer interrupt to make a sampling profiler
- tool to measure where program spends its execution time
- interrupt records which instruction was interrupted, instructions with high counts are "hot spots"
- add profile as shell command and use to find bottlenecks in your console program!
- design and implement module for 7-segment display, auto-refresh display using timer interrupt
- what is the fastest achieveable rate of periodic timer interrupt?
- first try on existing interrupts module to establish baseline
- then cut out everything you can, remove error/debug, code directly in trap handler that only does bare minimum, how fast can you get in/out?
- implement driver for PS/2 mouse
- add menu/buttons to your console? simple paint application?
- documentation on PS/2 mouse and "Host-to-Device Communication" PS/2 protocol
- we have PS/2 mice in lab for testing
- pick out code from previous module that displeases you and rework into something beautiful
- show us what you changed and why
- revisit extension from previous assignment
- was there an extension that interested you but didn't happen and want to go back and do now?
- want to return to previous extension and take it further?
Edit extension.c for your extension program (may be either application or unit tests for extended features) and use make extension to compile and run. Use the same git workflow as core, i.e. edit on dev branch, regularly commit and push. Edit the README.md file with brief summary of what you did/learned for the extension. Apply tag assign7-extension to submit when done.
The grading review of extensions is done in-person, you'll give us a demo and share about your learnings. See times for extension demo/grading on OH schedule. We look forward to seeing your creation!
The same guidelines apply to the extension as to the core: it is fine to use online resources and generative AI tools to answer your questions and help you learn new things, but not cool to use it to write or fix your code.
Submitting
The deliverables for assign7-submit are:
- A reworked
ps2.cmodule that uses gpio interrupts README.md(possibly empty)- all
assign7-submitfiles commit/tag/push by due date or before end of grace period
Additional for assign7-extension:
- extension program
extension.c README.mdwith information on your extension- use tag
assign7-extension, commit/tag/push files by end of grace period
Given the coincident push on finishing full system, we've intentionally scoped the assignment 7 tasks to be light compared to previous assignments. There also is no style reflection. We want you to submit assignment 7 by on-time deadline so you can focus attention on resolving open issues and readying your full system!
Grading
The only grading for assignment 7 is a repeat of same ps2 module unit tests we used for assign5 now running on your interrupt-driven ps2 module.
- ps2 (interrupt-driven)
- receive bits by interrupt
- read well-formed scancode
- discard malformed (wrong start/stop/parity) and restart, timeout resynchronize
- tough for you to directly test, just try your best and we'll run under our test rig to give you results
We plan to run the grading tests right after the on-time deadline and get results out post-haste so you have the opportunity to respond and tag for re-test ahead of the full system submission.
Libmymango and full system
The final assignment tasks are to submit retests to fix open issues and build your own libmymango and demo your modules working together in a harmonious whole.
🥭 Submit retest to fix issues
We are aiming for everyone to resolve all P1 issues, with added recognition for also resolving issues of lower priority.
After readying a fix and testing yourself, commit/tag/push to request retest from us. Tag assignN-retest for retest of assignN. You can tag the same commit with several retest tags if it contains fixes for more than one assignment. In the days leading up to the deadline, we will run retest cycle nightly and update issues with new results.
Does fixing all issues guarantee a successful full system? Probably. If you passed all unit tests (no open issues), you're likely on track for full system success. However, there can be discrepancies in either direction. The full system could be fine despite a failure on a unit test, where that bug is not exercised or detectable within the full system. Conversely, it is possible to have 100% success on all unit tests and yet still hit a failure on full system, such as a bad interaction between modules that only arises in integration or a lurking bug that was not covered in the unit tests.
TLDR; both matter! Use retest to resolve issues uncovered by unit tests (whether or not they affect full system) and supplement with manual testing of full system in integration (in addition to passing unit tests). Build interrupts_console_shell with MY_MODULE_SOURCES set to include all modules. Test the console application, taking care to exercise all module features being used: key combinations, shell commands, console wrap and scroll, and so on.
🥭 Build libmymango and demo full system
When all your modules are ready to go, change to mylib directory and use make to build libmymango.a. This packages together your battle-tested modules into a bare-metal library for easy re-use. In a future program such as the final project, copy the library file and add to Makefile and you are now able to program your Pi like an Arduino. See the fullsystem directory for a sample project template.
For fullsystem submit:
- Double-check that final versions of files for all assignments are committed and pushed.
- In directory
mylib, make should buildlibmymango.awithout warnings or errors. - Copy the final version of
libmymango.atofullsystemdirectory. Fullsystem console program should build without warnings or errors. - Self-evaluation in
fullsystem/README.md(see prompts below) - Tag final commit
fullsystem-submit.
Your libmymango is a major achievement! You have built a complete computer system from the ground up, writing your own code at every step of the way. Congratulations!
Retest and full system deadline is end of day Saturday The deadline for full system submit has historically been coincident with assignment 7, but we have decided to extend by a few extra days to get those last fixes in up. Submit for full system by Sat May 30th 11:59pm. This is also the deadline for any final fixes for retest. This deadline is firm.
Demo and interview
During week 9 and 10, we will schedule time for you to come in for demo/interview.
- Give us a demo of your full system that shows it is robust, complete, and "ready to ship"
- All functionality of libmymango.a is expected to work correctly, but in practice, only the specific features used by shell/console will be exercised. This means your
printfmust properly print zero-padded hexadecimal numbers (which are needed forpeek), but could slip by with a minor bug in formatting a large negative value (since they are not used by the shell). - Your console should feel reasonably responsive and the screen should update in a smooth and non-glitchy manner. It doesn't need to be blindingly fast, but it should not be painfully slow.
We'll also do a friendly interview to hear more about your work and your progress this quarter. Below are some prompts for self-reflection that we want to discuss . Edit the file fullsystem/README.md to jot down your quick thoughts on the three points below to give a starting point for the conversation. We want to hear about the learning and effort that made up your quarter and celebrate all the wins!
- Achievement
- Tell us about the work of which you are most proud and how those accomplishements are meaningful to you
- How solid do you feel on your achievement of the course learning goals?
- Effort, engagement
- Tell us about what goes on behind the scenes:
- Persistence through tough problem-solving
- Working through hard debugging challenges
- Multiple rewrites to get something right
- Side quests to explore additional material or further your mastery
- Teaching and learning with your peers, community-building
- Growth
- When did something finally "click" for you?
- How are you a more capable engineer now than at the start?
- Share a moment where you surprised yourself or didn't give up when it was hard
If there is any other info or context that would help us better understand your quarter, please share.
Course learning goals
Three cheers for YOU! 👏👏👏 This is your computer system, the one you built yourself from the ground up. Each line of code is there because you put it there, you know what it does, and why it is needed. We are in awe of the effort you put in to arrive here and hope you are as proud of your work as we are.
Reflecting on where you started, it has been an impressive journey. Take stock of the progress you have made on mastering these course learning goals:
✔︎ To understand how computers represent information, execute programs, and control peripherals
- Binary and hexadecimal number systems, machine encoding of instructions
- Memory layout, pointers, arrays, structs
- RISC-V assembly, use of registers, instruction control flow
- Runtime use of stack and heap memory
- Memory-mapped I/O to access to peripherals, device drivers (keyboard, display)
- Interrupts, simple multi-processing
✔︎ To master command-line programming tools and the C programming language
- Build tools (assembler, compiler, linker, make, bootloader)
- Implementation of standard C library functions (strings, printf, malloc, graphics)
- Strategies for testing and debugging code, using gdb
- Establishing a productive and effective programming workflow
Bring these skills into the final project, mix with your creativity and initiative, and something fabulous will surely result. We're looking forward to it!
