In this course, we use git repositories to share code between you and us.
These repositories are hosted on GitHub. You will use git commands such as git pull
to access starter code and git push to submit your work. You can read more about
the general use of git in our git guide.
In this document, we walk through the specific workflow to access the starter code and submit your work.
Note This guide assumes that you've already done the initial git setup of your
mycoderepo.
Organization of the mycode repo
The mycode repo is initially empty. The first thing you will add to it is the folder cs107e containing shared files that are used throughout. When you start each lab or assignment, you pull the folder of starter files for it. The lab folders are named lab0, lab1, and so on and the assignment folders are named assign0, assign1 and such. Each folder contains the files specific to the named lab or assignment. Below we list a mycode repo midway through the quarter after pulling the first few labs and assignments:
$ cd ~/cs107e_home/mycode
$ ls
assign0/ assign1/ cs107e/  lab0/    lab1/    lab2/
$ ls assign1
Makefile    larson.s
Your typical workflow will be to change to the subfolder for the particular lab or assignment you are currently working on. Within that subfolder, you edit files, build and run your code, make git commits, and so on.
In the instructions for the workflows we give below, we use assignX or labX as a generic
placeholder. When you issue the command, be sure to replace the placeholder with the specific name you are intend to work on, e.g. assign1 or lab2.
Lab workflow
When starting a new lab, update your local mycode repo by checking out the dev branch and pulling the lab starter files from the remote (change labX to lab1, lab2, as appropriate):
$ cd ~/cs107e_home/mycode               # change to your local mycode repo
$ git checkout dev                      # be on dev branch
$ git pull code-mirror labX-starter     # get starter files for labX (replace X with number)
(The git pull command may open up your editor and display the message Merge branch labX-starter into dev. Confirm the merge by saving and exiting the editor.)
After these commands, your repo is on dev branch and all files are up to date. cd to the labX folder and use ls to see the new files.
You don't need to commit or submit lab code to be graded. We use in person check-in during lab to confirm participation.
Assignment workflow
Here are the steps to start, work on, and submit an assignment.
Pull assignment starter code
When starting a new assignment, update your local mycode repo by checking out the dev branch and pulling the assignment starter files from the remote (change assignX to assign1, assign2, etc. as appropriate):
$ cd ~/cs107e_home/mycode               # change to your local mycode repo
$ git checkout dev                      # be on dev branch
$ git pull code-mirror assignX-starter  # get starter files for assignX (replace X with number)
(The git pull command may open up your editor and display the message Merge branch assignX-starter into dev. Confirm the merge by saving and exiting the editor.)
After these commands, your repo is on dev branch and all files are up to date. cd to the assignX folder and use ls to see the new files.
Assignment commit
You will work on your assignments in your local mycode repo. As you edit, we recommend that you
make regular git commits to record a snapshot of your work and track your progress. Each commit is
saved in your local repo. You can follow up with a git push to sync those changes with your remote
repo.
Note We strongly encourage you to develop the habit of commit early and often. Any time you make a change that you'd be upset to lose, take a moment to make a commit (usually, this is at least once an hour, often more frequently). Also make regular pushes to send your latest commits to the remote. This means you have an offsite backup if anything scary should befall your laptop!
To see the current state of your repo, use the git status command. It will indicate which files have been modified, which changes are "staged" (ready to be committed) and whether the local and remote repos are currently in sync.
$ git status # shows state of modified files
The commands below show how to add a changed file to the staging index, commit staged changes (save snapshot to local repo), and push the commit to GitHub (update remote repo):
$ git add filename.c    # adds file to staging
$ git commit -m "Short descriptive message about changes you are committing"  # commit
$ git push              # sync commits with remote repo on GitHub
The command git add . can be used as a
shorthand for adding all changed files to the staging index rather than adding individual files by name.
You can use git log to view the history of commits in your local repo. When
you enter the log, you can exit out by pressing "q" on your keyboard.
$ git log # show list of previous commits
Each commit that you make records a snapshot of your work. You can use these snapshots to review your progress, compare versions, or identify and undo an unfortunate change. Establishing good commit practices gives you the ability to navigate the history of code changes, as well as providing the opportunity to revert to previous versions. Sometimes you may find that you want to revert to a commit before some code changes that introduced a bug. The more frequently you commit, the more opportunities you have to restore previous working states without losing as much work. We recommend that you commit early and often and that you write detailed commit messages.
Git command responses can sometimes look cryptic and scary. DON'T BE SCARED! The worst thing you can do is just ignore the responses altogether, especially when you get warnings and errors. Git is your friend :) Reading all the responses will help you understand the commands your running, and prevent you from missing important messages about the state of your repo.
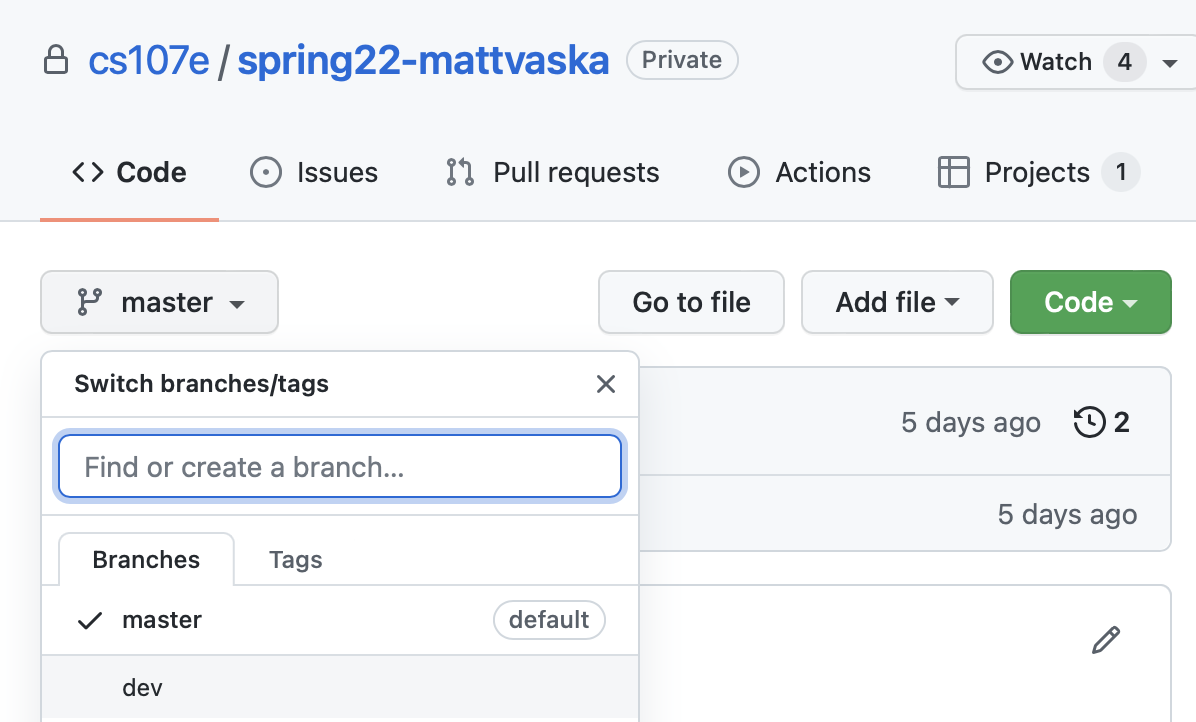
You can view the contents of your remote repo by browsing it on GitHub.
Note: GitHub will show commits for the master branch by default. To see activity
on the dev branch, switch to it by selecting from the drop-down menu:
Assignment tags
When grading your work, we'll run tests on your submission to verify its functionality. You must mark which commit you want us to test by applying a tag. A tag attaches a name to a commit. We'll also use this tag to determine your time of your submission.
Create a new tag for the latest commit
Create a tag to identify your assignment submission by doing the following (replace assignX with the appropriate assign0, assign1, etc.)
$ git tag assignX-submit      # tag most recent commit assignX-submit (replace X with number)
$ git push --tags             # sync tags with remote Github repo
A submission tag is of the format assignX-submit
where X is the particular assignment number. You can verify that your tag
was successful by browsing your repo on GitHub and
confirming that your newly created tag shows up in the Tags section of the branches
dropdown menu.
Adding a tag to an older commit
If you say misspelled a tag, forgot to tag, or otherwise need to go back and add a tag to an older commit here is how.
First you will need to find the commit hash of the tag you want. The commit hash is the really long sequence of letters and numbers next to each commit. To see a list of all your commits and their associated hashes run:
$ git log
To tag a specific commit, find the commit in the log listing and copy its hash. (You only need copy the first seven or eight characters) and use as the option extra argument to git tag command:
$ git tag assignX-submit 0b34cd1   # replace example hash 0b34cd1 with actual hash
$ git push --tags                  # sync tags with remote Github repo
Move tag for resubmit
If you need to update your previously tagged submission with additional changes, move the tag to a different commit with the following commands
(note that you need the --force flag to move or push a tag that already exists. --force can be shortened to just -f).
$ git tag --force assignX-submit    # move assignX-submit tag to most recent commit (replacing previous)
$ git push --force --tags           # sync tags with remote (replacing previous)
If you complete one of the extensions for the assignment, add the tag assignX-extension
on the commit containing the code for the extension. Your extension commit can be tagged on
same commit as your basic functionality, or it can be a different one. We use the extension
tag to identify which submissions have attempted the extension. If there is no extension
tag, we will not test/grade it and will assume the extension was not attempted.
See the section below entitled 'Assignment Submission' for a checklist of steps to complete when you submit your assignment.
Assignment checklist
This guide contains a lot of information. Here is a checklist to follow when you are submitting your assignments.
To submit an assignment:
- Ensure all of your code is committed and pushed (see Assignment commit)
- Tag with
assignX-submitand, if applicable,assignX-extension(see Assignment tags) and tags are pushed. - If you want to replace a previous submission, move the submit tag to the updated commit and force push.
- You can confirm which files you submitted by browsing your remote repo on GitHub. Choose
assignX-submittag from the dropdown menu to review the submitted files and their contents.
After receiving our grading feedback, you will have the opportunity to submit fixes and request a re-test of open issues. To submit fixes for re-test:
- Ensure all of your code is committed and pushed.
- Tag with
assignX-retestand push the tag to remote.
Assignments test results/issues
To evaluate functionality, we run your code through a sequence of automated tests
and report any bugs found by posting
issues on your remote Github repository.
View the Issues tab on Github to see a list of your issues. Each issue corresponds to a failed
test. If the test result includes output log files, the student log file is the output generated when running
your code and the staff log file is the output generated by our staff solution. Comparing the staff
output to your own will give you insight as to why your code failed the test.
Assignment retest
After receiving our grading feedback, you may use revise and resubmit to correct issues with
your previous submission. After correcting the code and doing your own testing, commit
and push the correct code and request a retest by tagging the commit with assignX-retest.
We will try to run one retest run per week on all repos that have updated retest tags.
After retest, we will update the Issues tab to show the updated results and close any resolved issues.
Eligible for retest:
- Core functionality for all libmango modules, assignments 2-7.
Not eligible for retest:
- Extensions
- Quality/style
- Assignment 1 larson scanner and Assignment 2 clock application (retest is available for gpio and timer modules).
Code ineligible for retest is graded on what was committed in the original submission.