These are the instructions for setting up a development environment using the Windows Subsystem for Linux (WSL). We peppered the installation instructions with Check steps that confirm your progress through the steps. Use each to validate a step before moving on. If you hit a snag, stop and reach out (forum, office hours) and we can help you out!
You may need to restart your computer a few times throughout this process, so it’s a good idea to save all work before starting so you can restart when prompted.
Requirements
Got WSL? By now you should already have installed WSL, if you don't, please first follow the WSL installation guide first and then come back here to install the developer tools.
Note: all terminal commands below should be entered in the WSL terminal!
Before starting, confirm that you are running an appropriate version of Ubuntu and WSL.
Check: confirm Ubuntu and WSL version 1
$ lsb_release -a
No LSB modules are available.
Distributor ID: Ubuntu
Description:    Ubuntu 24.04 LTS
Release:        24.04
Codename:       noble
$ powershell.exe "wsl --list --verbose"
  NAME              STATE       VERSION
 *Ubuntu-24.04      Running     1
Be sure you have WSL version 1 WSL version 2 is not compatible with the tools we use in this course.
Install riscv-unknown-elf toolchain and prerequisites
- Install prerequisites and base toolchain.
$ sudo apt install build-essential gcc-riscv64-unknown-elf - Download archive of our custom debugger build and extract files into place.
$ wget https://github.com/cs107e/homebrew-cs107e/raw/master/riscv64-gdb-wsl.tar.xz
$ sudo tar -xvf riscv64-gdb-wsl.tar.xz -C /usr/local/bin
$ rm riscv64-gdb-wsl.tar.xz  # remove archive, not needed
Check: confirm compiler and debugger with simulator
$ riscv64-unknown-elf-gcc --version
riscv64-unknown-elf-gcc () 13.2.0
Copyright (C) 2022 Free Software Foundation, Inc.
$ riscv64-unknown-elf-gdb
GNU gdb (GDB) 13.2
... blah blah blah ...
(gdb) target sim
Connected to the simulator.
(gdb) quit
Install xfel
Next, we need to install xfel (https://github.com/xboot/xfel), which is the tool that we use to communicate with your Pi (i.e., send code and other nifty tricks).
- Change to the proper directory, download the xfel archive, and unpack it. Replace
[YOUR-WINDOWS-USERNAME]with the name of your Windows login account.$ cd /mnt/c/Users/[YOUR-WINDOWS-USERNAME] $ wget https://github.com/cs107e/homebrew-cs107e/raw/master/xfelWin32.tar.gz $ sudo tar -xvf xfelWin32.tar.gz # sudo to permit update file modtime $ rm xfelWin32.tar.gz # done with archive, remove - Run the "zadig-2.8.exe" to install the USB device drive. When application launches, it will pop up an alert that asks you to confirm it can make changes to your drivers, be sure to click "yes".
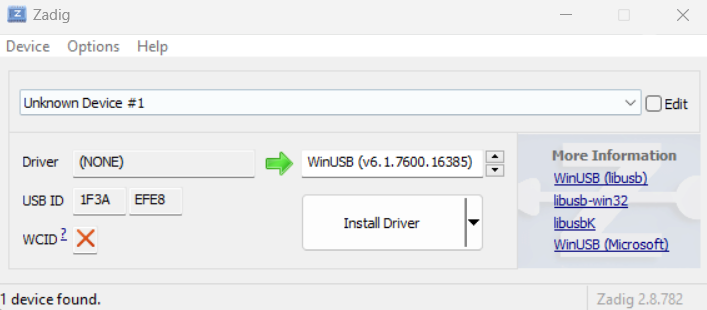
$ powershell.exe "./xfel/zadig-2.8.exe" - In the Zadig window that looks like screenshot below:
- choose
Create New Devicefrom theDevicemenu - enter
Mango Pias the description text (may need to click theEditcheckbox first) - enter
1F3AEFE8for the USB ID - choose
libusbKfrom the popup next to the green arrow - click the large button that says
Install Driveror 'Reinstall Driver'. The progress meter comes up and reports "Installing Driver…" as it works. Wait to comfirm the installation successfully completes and close zadig.

- choose
- Now we will create a symbolic link for the xfel executable. This allows us to keep the executable in the Windows file system while still being able to call it from WSL (this arrangement is needed to avoid a painfully long antivirus scan by Windows Defender on every invocation of xfel).
$ sudo ln -sf /mnt/c/Users/[YOUR-WINDOWS-USERNAME]/xfel/xfel /usr/local/binIf this worked, xfel will be findable on your wsl path:
 $ which xfel
 $ /usr/local/bin/xfel
Check: confirm xfel
Confirm xfel is properly installed by running the command below.
$ xfel
xfel(v1.3.2) - https://github.com/xboot/xfel
usage:
    xfel version                                        - Show chip version
    xfel hexdump <address> <length>                     - Dumps memory region in hex
    xfel dump <address> <length>                        - Binary memory dump to stdout
    ... blah blah blah ...
Installation complete
Yay! If you made it this far, you should feel so proud! Head back to the main installation guide to do one last set of checks.